
Build the Perfect Entry Model
Build the Perfect Entry Model
A Practical ICT Framework for Building High-Probability Entries
A Practical ICT Framework for Building High-Probability Entries

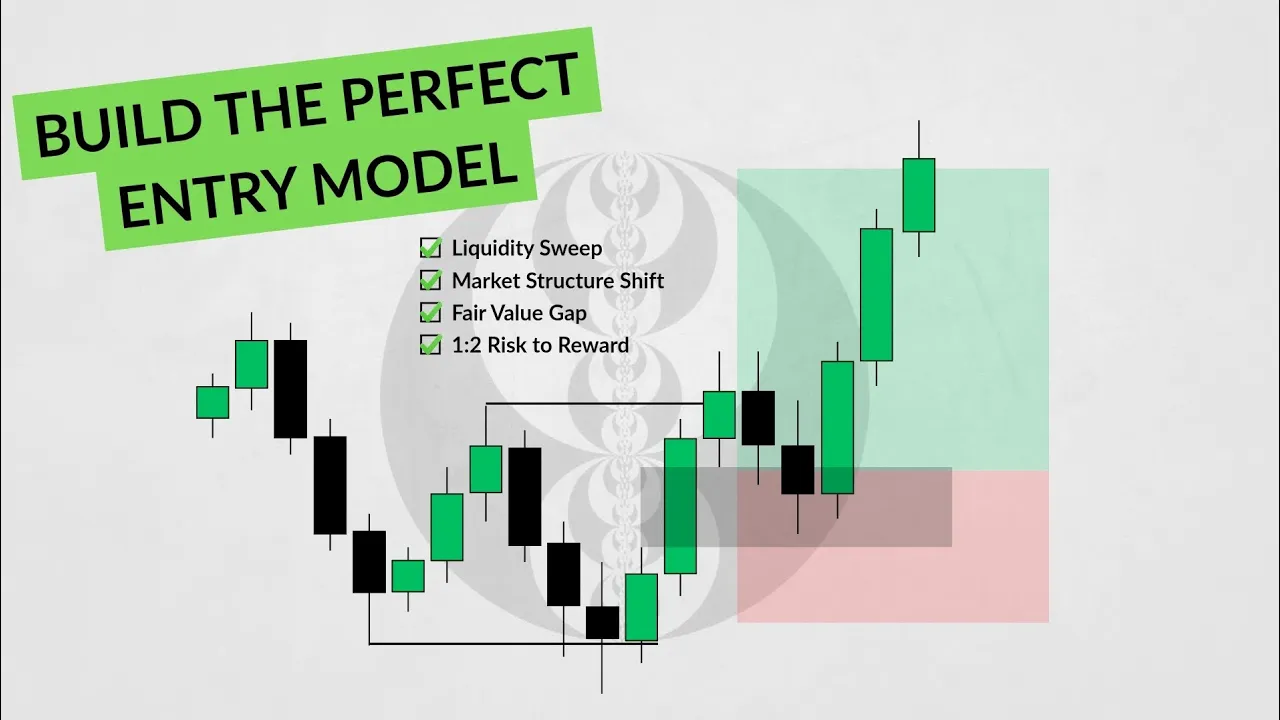
BUILD THE PERFECT ENTRY MODEL
Entries are one of the most important components of trading. You can have the right bias, identify the correct Draw on Liquidity, and understand where price is likely to go, but you still need a structured way to actually enter the trade.
This is where an entry model comes in.
An entry model gives you a specific sequence of events to wait for before entering a trade. Instead of entering simply because price reaches a certain level, you wait for the market to give you the confirmations that make up your setup.
In this article, we'll combine several ICT-based concepts to build five different entry models.
The concepts we'll be using are:
Liquidity Sweep
Market Structure Shift
Fair Value Gap
Inverse Fair Value Gap
SMT Divergence
Breaker Block
Balanced Price Range
These concepts can be combined in different ways to create structured entry models.
The five models covered here are:
Liquidity Sweep + Market Structure Shift + Fair Value Gap
Liquidity Sweep + Balanced Price Range
SMT Divergence + Market Structure Shift + Inverse Fair Value Gap
SMT Divergence + Market Structure Shift + Breaker Block
Liquidity Sweep + Market Structure Shift + Breaker Block + Fair Value Gap
Let's break each one down.
Liquidity Sweep + Market Structure Shift + Fair Value Gap
This is one of the simplest entry models in this framework.
For a bullish setup, the first thing you want to see is price take out a swing low. This is the liquidity sweep.
After the sweep, you want to see an impulsive move to the upside that breaks a relevant swing high and shifts the market structure.
The important part is that the move should be strong enough to show a clear change in short-term order flow.

During this impulsive move, price should leave behind a Fair Value Gap.
This is where the entry comes in.
Rather than chasing price after the displacement, you wait for price to retrace into the Fair Value Gap created by the move that shifted structure.

The stop loss can be placed below the swing low that was formed during the setup, and the target can be based on a 1:2 risk-to-reward ratio.
The complete sequence is:
Liquidity Sweep → Market Structure Shift → Fair Value Gap → Retracement → Entry

One important detail is what to do when multiple FVGs are created during the displacement.
If several Fair Value Gaps are present, the preferred entry is the latest FVG that was created by the move that actually broke structure.
This keeps the entry connected to the displacement responsible for the market structure shift rather than simply choosing any FVG that happens to appear along the way.

The same concept can be applied to a bearish setup by reversing the sequence: price sweeps a swing high, shifts structure to the downside, creates a bearish FVG, and the retracement into that FVG becomes the area of interest.
Liquidity Sweep + Balanced Price Range
The second entry model combines a liquidity sweep with a Balanced Price Range (BPR).
Here, the setup begins with a liquidity sweep.
After the sweep, you want to see price disrespect an opposing Fair Value Gap with an impulsive move and create a new FVG in the opposite direction.
For example, in a bullish setup, price first sweeps sell-side liquidity.
Price then moves aggressively higher through a bearish FVG, showing that the bearish imbalance is no longer being respected. During this move, price creates a new bullish FVG.
When these two FVGs overlap, they create the area known as a Balanced Price Range.

The important part of this setup is the relationship between the two FVGs.
You are not simply looking for an FVG. You are looking for:
Liquidity Sweep → Opposing FVG Disrespected → New FVG → FVG Overlap → BPR
Once the BPR has formed, the overlap between the two Fair Value Gaps becomes the area where you look for the entry.

The stop loss can be placed below the relevant swing low, with the target set at a 1:2 risk-to-reward ratio.
The bearish version works in the opposite direction: price sweeps buy-side liquidity, disrespects a bullish FVG, creates a bearish FVG, and the overlap between the two creates the BPR.
SMT Divergence + Inverse Fair Value Gap
The third model introduces SMT Divergence.
The setup begins with an SMT divergence between two correlated markets.

After the SMT divergence, you want price to inverse a Fair Value Gap.
In other words, an FVG that previously supported one direction is broken through and begins to act as an area of interest from the opposite side.
For a bullish setup, price can move through a bearish FVG, shift structure to the upside, and turn that previous bearish FVG into an Inverse Fair Value Gap.

Once the inverse FVG has been established, the retracement back into that area becomes the entry opportunity.
The stop loss can be placed below the relevant swing low, with a 1:2 risk-to-reward ratio as the target.
The sequence is:
SMT → FVG Inversion → Retracement → Entry

Stop Loss Placement
When trading SMT Divergence, stop loss placement is extremely important. The placement of the stop should depend on how price develops after the SMT is formed.
If the SMT setup creates a lower high or higher low, there are two areas where the stop loss can be placed: either at the latest swing low/high formed after the SMT, or at the original swing point that created the SMT.

If the SMT setup instead creates a higher high or lower low, the stop loss should be placed at the most recent swing point formed before the entry.

SMT Divergence + Market Structure Shift + Breaker Block
The fourth model also begins with an SMT divergence, but instead of using an Inverse FVG, the setup uses a Breaker Block.
First, you want to identify the SMT divergence.
After the SMT forms, you wait for price to shift market structure in the expected direction.

When price shifts structure, pay attention to the price action that created the move. The relevant failed order block can then become a Breaker Block.
The key is that the structure shift should give you a clear reason for the order block to fail and become a breaker.
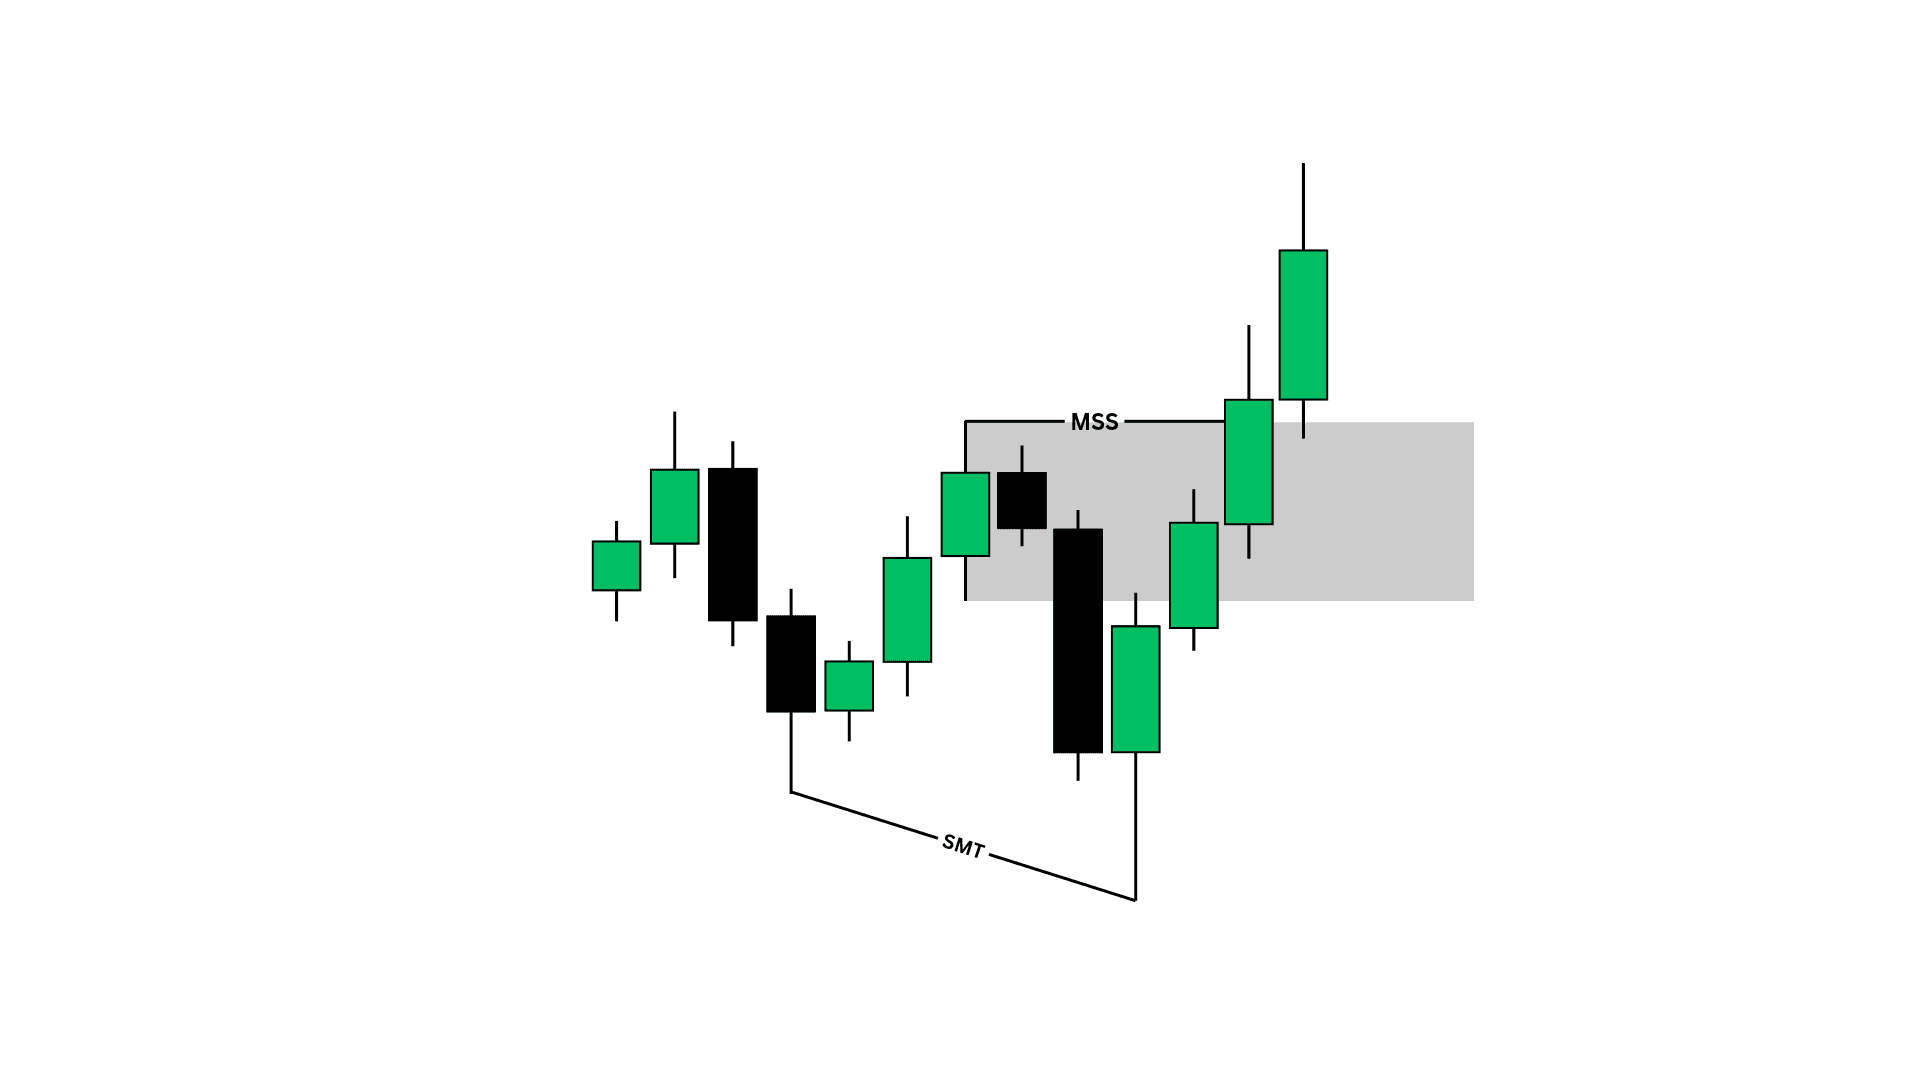
Once the Breaker Block has been established, the retracement back into that area becomes the entry opportunity.
Rather than entering immediately after the structure shift, a limit order can be placed at the Breaker Block, with the stop loss below the relevant swing low.
The target can again be based on a 1:2 risk-to-reward ratio.

The sequence becomes:
SMT → Market Structure Shift → Breaker Block → Retracement → Entry
Liquidity Sweep + Market Structure Shift + Breaker Block + Fair Value Gap
The final model combines four concepts into one entry model.
The setup begins with a liquidity sweep.
For a bullish setup, price first takes out a swing low. After the sweep, you want to see an impulsive move higher that shifts market structure.
The quality of the structure shift is important here.
You want the move to be strong and impulsive, because that is what can create both the Breaker Block and the Fair Value Gap.
As price shifts structure, it leaves behind a Breaker Block. At the same time, the strength of the displacement creates a Fair Value Gap.
The ideal setup is when the Breaker Block and Fair Value Gap overlap.
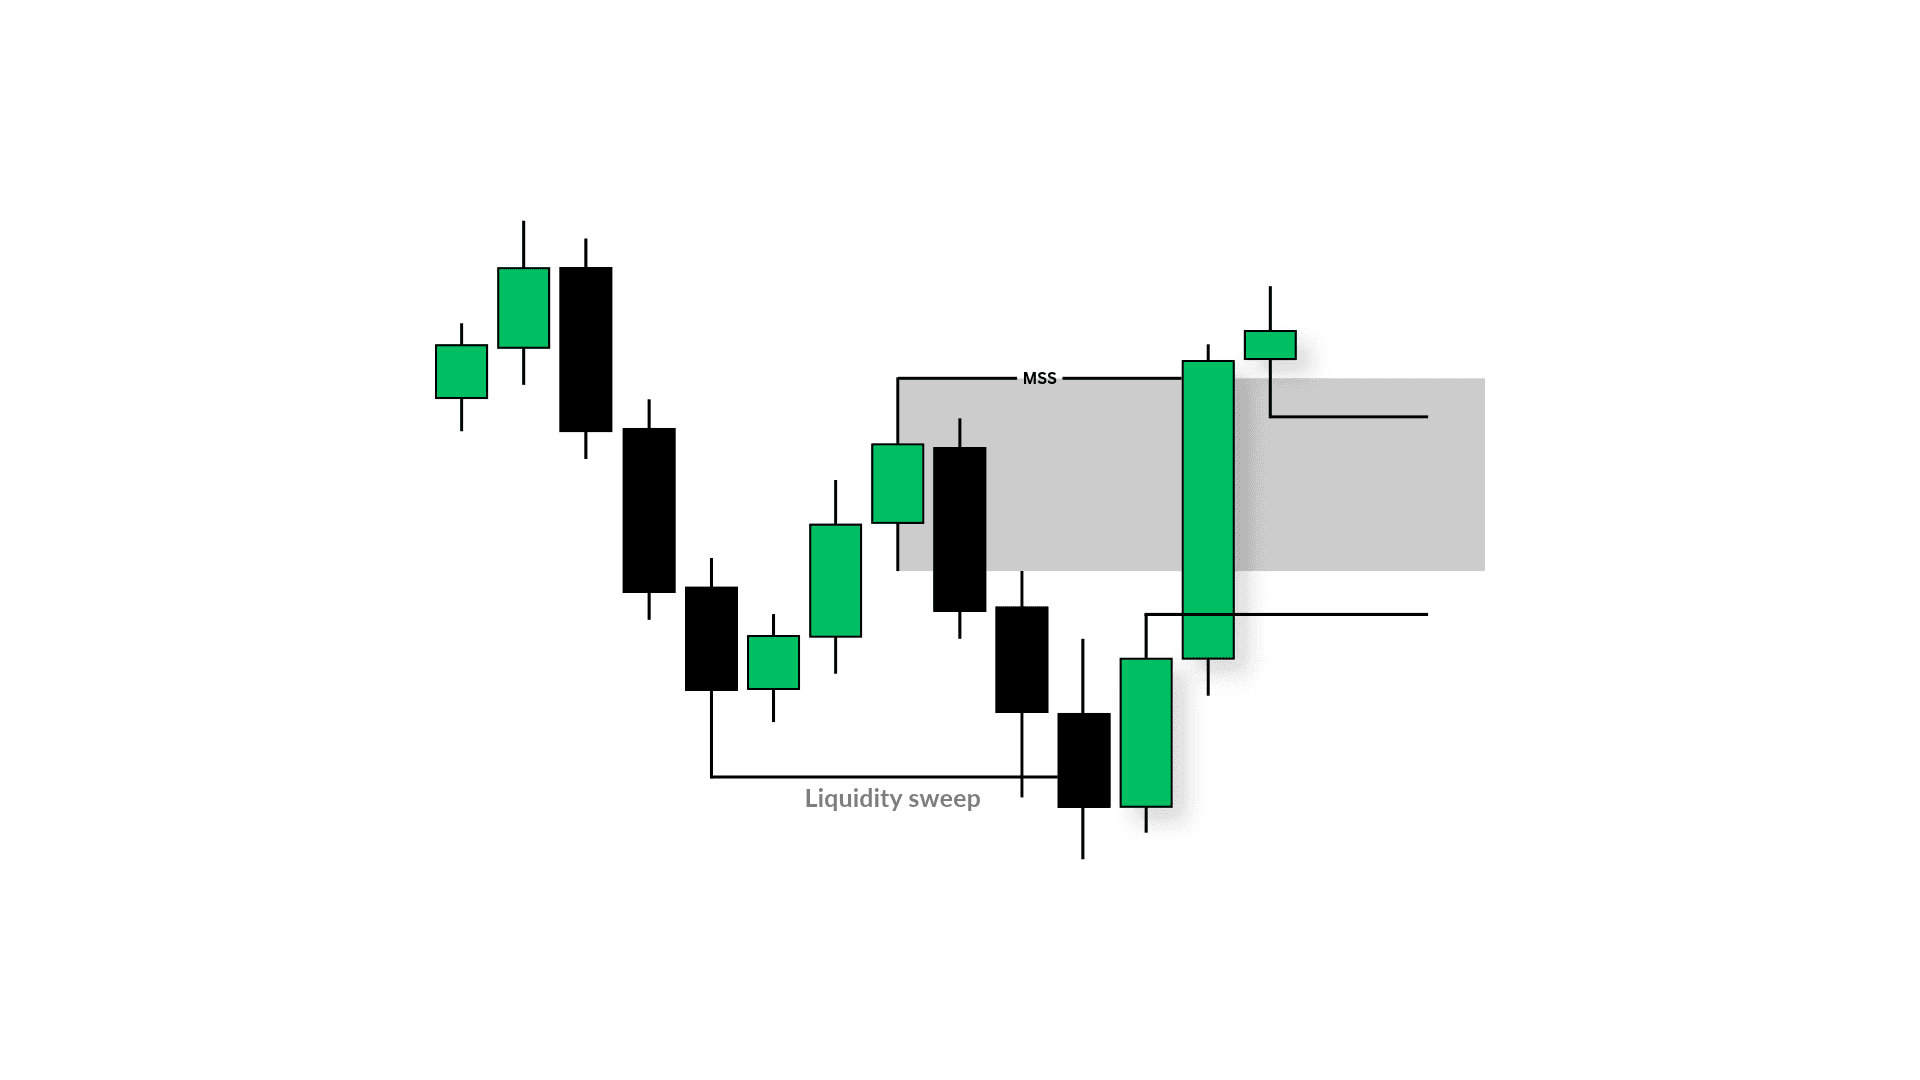
This overlap becomes the entry area.
Rather than taking an entry from the Breaker Block alone or the FVG alone, you wait for the area where both concepts come together.
The stop loss is placed below the relevant swing low, while the target is based on a 1:2 risk-to-reward ratio.
The complete sequence is:
Liquidity Sweep → Market Structure Shift → Breaker Block + FVG → Overlap → Entry

Putting the Models Together
Although these five models use different combinations of concepts, they all follow the same basic idea.
You are not looking at one concept in isolation.
You are waiting for multiple pieces of information to come together.
A liquidity sweep can show that liquidity has been taken.
A market structure shift can show a change in direction.
A Fair Value Gap shows you displacement.
An Inverse Fair Value Gap can show that an imbalance has changed its role.
A Breaker Block can provide another entry area after a failed order block.
An SMT divergence can provide additional confirmation through the relationship between correlated markets.
The goal is therefore not to put as many concepts as possible onto one chart.
The goal is to understand what each concept is telling you and how they can work together to create a structured entry.
A good entry model should answer three simple questions:
What happened before the entry?
What confirms the direction?
Where exactly is the entry?
Once those questions are answered, the setup becomes much easier to execute.
And remember, an entry model does not replace your bias, higher-timeframe point of interest, or risk management.
Those provide the context.
The entry model simply gives you a structured way to participate when price reaches the area you're interested in.
Context gives you the reason.
Confirmation gives you the setup.
The entry model gives you the execution.
Watch Full Video on Youtube
BUILD THE PERFECT ENTRY MODEL
Entries are one of the most important components of trading. You can have the right bias, identify the correct Draw on Liquidity, and understand where price is likely to go, but you still need a structured way to actually enter the trade.
This is where an entry model comes in.
An entry model gives you a specific sequence of events to wait for before entering a trade. Instead of entering simply because price reaches a certain level, you wait for the market to give you the confirmations that make up your setup.
In this article, we'll combine several ICT-based concepts to build five different entry models.
The concepts we'll be using are:
Liquidity Sweep
Market Structure Shift
Fair Value Gap
Inverse Fair Value Gap
SMT Divergence
Breaker Block
Balanced Price Range
These concepts can be combined in different ways to create structured entry models.
The five models covered here are:
Liquidity Sweep + Market Structure Shift + Fair Value Gap
Liquidity Sweep + Balanced Price Range
SMT Divergence + Market Structure Shift + Inverse Fair Value Gap
SMT Divergence + Market Structure Shift + Breaker Block
Liquidity Sweep + Market Structure Shift + Breaker Block + Fair Value Gap
Let's break each one down.
Liquidity Sweep + Market Structure Shift + Fair Value Gap
This is one of the simplest entry models in this framework.
For a bullish setup, the first thing you want to see is price take out a swing low. This is the liquidity sweep.
After the sweep, you want to see an impulsive move to the upside that breaks a relevant swing high and shifts the market structure.
The important part is that the move should be strong enough to show a clear change in short-term order flow.
During this impulsive move, price should leave behind a Fair Value Gap.
This is where the entry comes in.
Rather than chasing price after the displacement, you wait for price to retrace into the Fair Value Gap created by the move that shifted structure.
The stop loss can be placed below the swing low that was formed during the setup, and the target can be based on a 1:2 risk-to-reward ratio.
The complete sequence is:
Liquidity Sweep → Market Structure Shift → Fair Value Gap → Retracement → Entry
One important detail is what to do when multiple FVGs are created during the displacement.
If several Fair Value Gaps are present, the preferred entry is the latest FVG that was created by the move that actually broke structure.
This keeps the entry connected to the displacement responsible for the market structure shift rather than simply choosing any FVG that happens to appear along the way.
The same concept can be applied to a bearish setup by reversing the sequence: price sweeps a swing high, shifts structure to the downside, creates a bearish FVG, and the retracement into that FVG becomes the area of interest.
Liquidity Sweep + Balanced Price Range
The second entry model combines a liquidity sweep with a Balanced Price Range (BPR).
Here, the setup begins with a liquidity sweep.
After the sweep, you want to see price disrespect an opposing Fair Value Gap with an impulsive move and create a new FVG in the opposite direction.
For example, in a bullish setup, price first sweeps sell-side liquidity.
Price then moves aggressively higher through a bearish FVG, showing that the bearish imbalance is no longer being respected. During this move, price creates a new bullish FVG.
When these two FVGs overlap, they create the area known as a Balanced Price Range.
The important part of this setup is the relationship between the two FVGs.
You are not simply looking for an FVG. You are looking for:
Liquidity Sweep → Opposing FVG Disrespected → New FVG → FVG Overlap → BPR
Once the BPR has formed, the overlap between the two Fair Value Gaps becomes the area where you look for the entry.
The stop loss can be placed below the relevant swing low, with the target set at a 1:2 risk-to-reward ratio.
The bearish version works in the opposite direction: price sweeps buy-side liquidity, disrespects a bullish FVG, creates a bearish FVG, and the overlap between the two creates the BPR.
SMT Divergence + Inverse Fair Value Gap
The third model introduces SMT Divergence.
The setup begins with an SMT divergence between two correlated markets.
After the SMT divergence, you want price to inverse a Fair Value Gap.
In other words, an FVG that previously supported one direction is broken through and begins to act as an area of interest from the opposite side.
For a bullish setup, price can move through a bearish FVG, shift structure to the upside, and turn that previous bearish FVG into an Inverse Fair Value Gap.
Once the inverse FVG has been established, the retracement back into that area becomes the entry opportunity.
The stop loss can be placed below the relevant swing low, with a 1:2 risk-to-reward ratio as the target.
The sequence is:
SMT → FVG Inversion → Retracement → Entry
Stop Loss Placement
When trading SMT Divergence, stop loss placement is extremely important. The placement of the stop should depend on how price develops after the SMT is formed.
If the SMT setup creates a lower high or higher low, there are two areas where the stop loss can be placed: either at the latest swing low/high formed after the SMT, or at the original swing point that created the SMT.
If the SMT setup instead creates a higher high or lower low, the stop loss should be placed at the most recent swing point formed before the entry.
SMT Divergence + Market Structure Shift + Breaker Block
The fourth model also begins with an SMT divergence, but instead of using an Inverse FVG, the setup uses a Breaker Block.
First, you want to identify the SMT divergence.
After the SMT forms, you wait for price to shift market structure in the expected direction.
When price shifts structure, pay attention to the price action that created the move. The relevant failed order block can then become a Breaker Block.
The key is that the structure shift should give you a clear reason for the order block to fail and become a breaker.
Once the Breaker Block has been established, the retracement back into that area becomes the entry opportunity.
Rather than entering immediately after the structure shift, a limit order can be placed at the Breaker Block, with the stop loss below the relevant swing low.
The target can again be based on a 1:2 risk-to-reward ratio.
The sequence becomes:
SMT → Market Structure Shift → Breaker Block → Retracement → Entry
Liquidity Sweep + Market Structure Shift + Breaker Block + Fair Value Gap
The final model combines four concepts into one entry model.
The setup begins with a liquidity sweep.
For a bullish setup, price first takes out a swing low. After the sweep, you want to see an impulsive move higher that shifts market structure.
The quality of the structure shift is important here.
You want the move to be strong and impulsive, because that is what can create both the Breaker Block and the Fair Value Gap.
As price shifts structure, it leaves behind a Breaker Block. At the same time, the strength of the displacement creates a Fair Value Gap.
The ideal setup is when the Breaker Block and Fair Value Gap overlap.
This overlap becomes the entry area.
Rather than taking an entry from the Breaker Block alone or the FVG alone, you wait for the area where both concepts come together.
The stop loss is placed below the relevant swing low, while the target is based on a 1:2 risk-to-reward ratio.
The complete sequence is:
Liquidity Sweep → Market Structure Shift → Breaker Block + FVG → Overlap → Entry
Putting the Models Together
Although these five models use different combinations of concepts, they all follow the same basic idea.
You are not looking at one concept in isolation.
You are waiting for multiple pieces of information to come together.
A liquidity sweep can show that liquidity has been taken.
A market structure shift can show a change in direction.
A Fair Value Gap shows you displacement.
An Inverse Fair Value Gap can show that an imbalance has changed its role.
A Breaker Block can provide another entry area after a failed order block.
An SMT divergence can provide additional confirmation through the relationship between correlated markets.
The goal is therefore not to put as many concepts as possible onto one chart.
The goal is to understand what each concept is telling you and how they can work together to create a structured entry.
A good entry model should answer three simple questions:
What happened before the entry?
What confirms the direction?
Where exactly is the entry?
Once those questions are answered, the setup becomes much easier to execute.
And remember, an entry model does not replace your bias, higher-timeframe point of interest, or risk management.
Those provide the context.
The entry model simply gives you a structured way to participate when price reaches the area you're interested in.
Context gives you the reason.
Confirmation gives you the setup.
The entry model gives you the execution.
Watch Full Video on Youtube


Read all

Free market insights and exclusive updates, straight to your inbox.
No spam. We hate it as much as you do.
Copyright © 2025 ChartTactix. All rights reserved.
Free market insights and exclusive updates, straight to your inbox.
No spam. We hate it as much as you do.
Copyright © 2025 ChartTactix. All rights reserved.
Copyright © 2025 ChartTactix. All rights reserved.
Market insights and exclusive updates.
No spam. We hate it as much as you do.
Copyright © 2025 ChartTactix. All rights reserved.
Market insights and exclusive updates.
No spam. We hate it as much as you do.