
Breaker Blocks
Breaker Blocks
Understanding Bullish and Bearish Breaker Blocks and How to Trade Them
Understanding Bullish and Bearish Breaker Blocks and How to Trade Them
Introduction
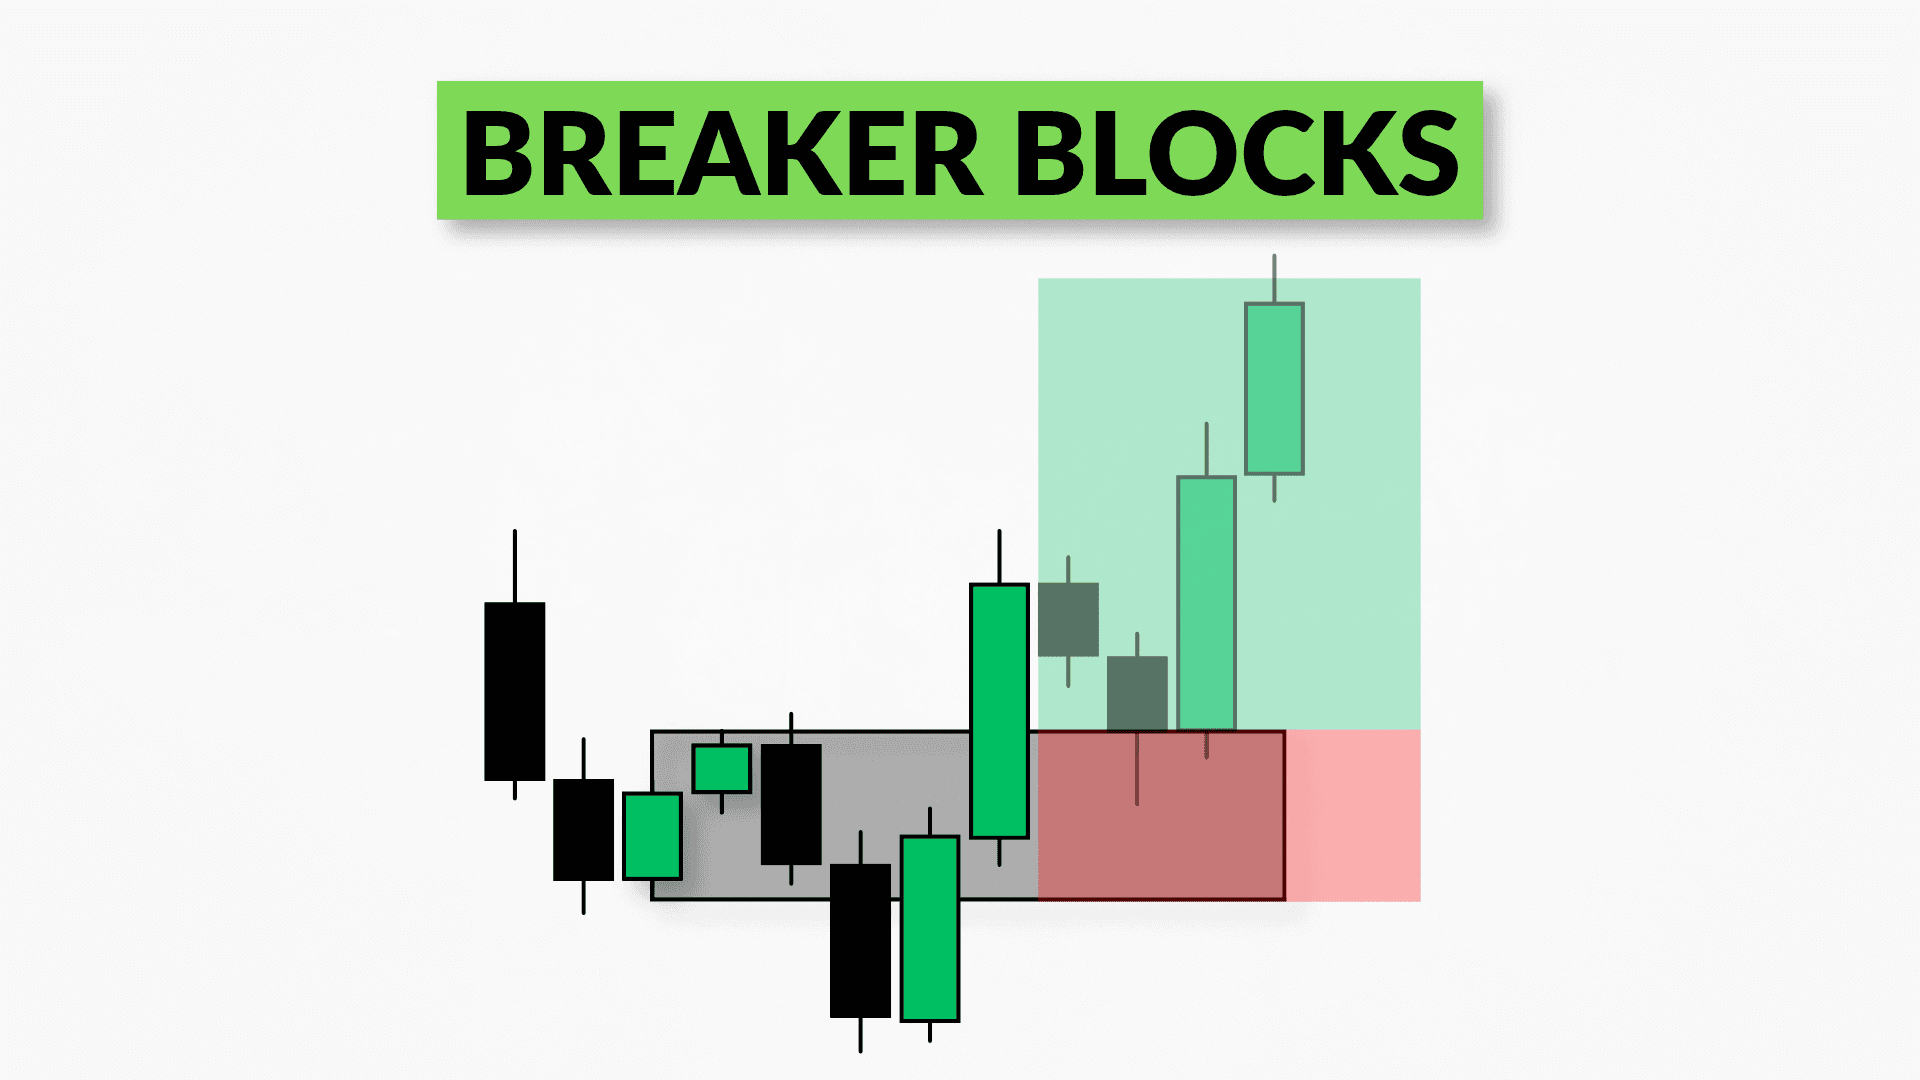
A Breaker Block is an order block that fails to hold price. When price breaks through it and later returns to that area. Instead of acting as support or resistance in its original direction, the area may now act in the opposite direction.
Breaker blocks can be useful because they help traders identify potential entry points after a shift in market structure.

How to Identify a Bullish Breaker Block
To identify a potential bullish breaker, look for the following price sequence:
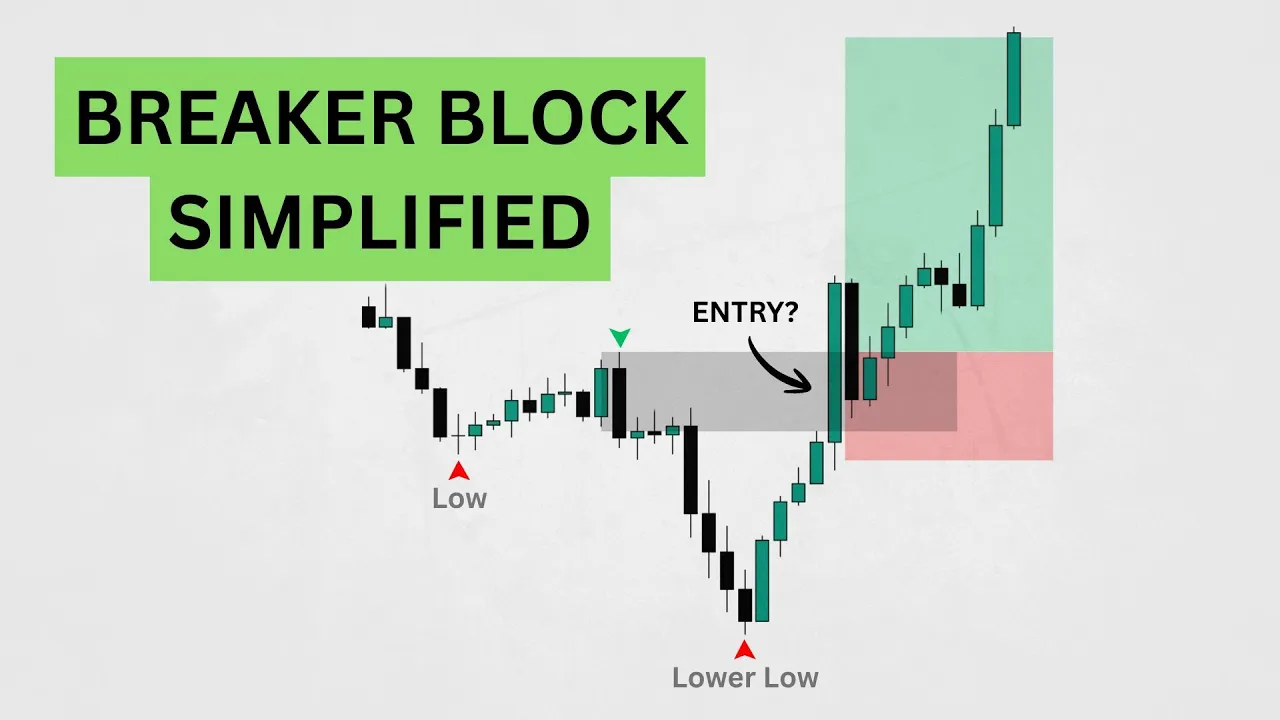
Low → High → Lower Low → Higher High
Price forms a low and moves upward to create a high. It then moves lower, takes out the previous low, and forms a lower low. After this, price reverses and breaks above the previous high, creating a bullish market structure shift.
The bearish order block associated with the move that created the lower low can then become a bullish breaker when price invalidates it and breaks upward through the relevant structure.
When price later returns to this breaker area, it may act as support and provide a potential bullish trading opportunity.

How to Identify a Bearish Breaker Block
A bearish breaker follows the opposite sequence:
High → Low → Higher High → Lower Low
Price forms a high and moves lower to create a low. It then moves higher, takes out the previous high, and forms a higher high. Afterward, price reverses and breaks below the previous low, creating a bearish market structure shift.
The bullish order block associated with the move that created the higher high can become a bearish breaker when price invalidates it and breaks downward through the relevant structure.
If price later retraces into this area, the breaker may act as resistance and provide a potential bearish trading opportunity.

How to Trade Breaker Blocks
Using a Breaker Block as an Entry Point
One way to use breaker blocks is as an entry confirmation when price reaches a higher-timeframe Point of Interest (POI).
For example, let's say price is approaching a higher-timeframe bullish POI. Instead of entering immediately when price reaches that area, you can drop to a lower timeframe and wait for a bullish breaker block to form.
Once an order block fails, price shifts structure to the upside, and a bullish breaker block forms, you can wait for price to retest the breaker block before taking your entry. You can then look to target a 1:2 risk-to-reward ratio.
This approach is useful because you already have a higher-timeframe POI where you expect price to react. The lower-timeframe breaker block provides additional confirmation that price may be respecting that area.

Stop-Loss Placement
When trading breaker blocks, there are two ways you can approach stop-loss placement: aggressive and conservative. Both have their advantages and disadvantages, so let's look at how they work.
Aggressive Stop-Loss Placement
With the aggressive approach, you place your stop loss at the low of a bullish breaker block or the high of a bearish breaker block.
The main advantage of this approach is that it gives you a smaller stop loss, allowing you to achieve a higher risk-to-reward ratio. Depending on your entry and target, you could potentially target a 1:3, 1:4, 1:5, or even higher risk-to-reward ratio.
However, the downside is that your stop loss may be more vulnerable to price fluctuations and stop hunts. Since your stop loss is closer to your entry, price has less room to move against you before your trade is stopped out, even if it later continues in your expected direction.

Conservative Stop-Loss Placement
With the conservative approach, you place your stop loss at the swing low in a bullish setup or the swing high in a bearish setup.
The advantage of this method is that it gives the trade more room to breathe and may reduce the chances of being stopped out prematurely by normal price fluctuations.
However, because your stop loss is farther from your entry, you will generally have a larger stop-loss distance and a lower risk-to-reward ratio for the same target.

Which Approach Should You Use?
Both approaches have their advantages and disadvantages. Neither one is the holy grail.
The aggressive approach offers a tighter stop loss and the potential for higher risk-to-reward ratios, while the conservative approach gives price more room to move before your trade is invalidated.
The most important thing is to choose the approach that fits your trading style, test it with historical chart examples, and remain consistent with your choice.
Youtube Video
Introduction
A Breaker Block is an order block that fails to hold price. When price breaks through it and later returns to that area. Instead of acting as support or resistance in its original direction, the area may now act in the opposite direction.
Breaker blocks can be useful because they help traders identify potential entry points after a shift in market structure.
How to Identify a Bullish Breaker Block
To identify a potential bullish breaker, look for the following price sequence:
Low → High → Lower Low → Higher High
Price forms a low and moves upward to create a high. It then moves lower, takes out the previous low, and forms a lower low. After this, price reverses and breaks above the previous high, creating a bullish market structure shift.
The bearish order block associated with the move that created the lower low can then become a bullish breaker when price invalidates it and breaks upward through the relevant structure.
When price later returns to this breaker area, it may act as support and provide a potential bullish trading opportunity.
How to Identify a Bearish Breaker Block
A bearish breaker follows the opposite sequence:
High → Low → Higher High → Lower Low
Price forms a high and moves lower to create a low. It then moves higher, takes out the previous high, and forms a higher high. Afterward, price reverses and breaks below the previous low, creating a bearish market structure shift.
The bullish order block associated with the move that created the higher high can become a bearish breaker when price invalidates it and breaks downward through the relevant structure.
If price later retraces into this area, the breaker may act as resistance and provide a potential bearish trading opportunity.
How to Trade Breaker Blocks
Using a Breaker Block as an Entry Point
One way to use breaker blocks is as an entry confirmation when price reaches a higher-timeframe Point of Interest (POI).
For example, let's say price is approaching a higher-timeframe bullish POI. Instead of entering immediately when price reaches that area, you can drop to a lower timeframe and wait for a bullish breaker block to form.
Once an order block fails, price shifts structure to the upside, and a bullish breaker block forms, you can wait for price to retest the breaker block before taking your entry. You can then look to target a 1:2 risk-to-reward ratio.
This approach is useful because you already have a higher-timeframe POI where you expect price to react. The lower-timeframe breaker block provides additional confirmation that price may be respecting that area.
Stop-Loss Placement
When trading breaker blocks, there are two ways you can approach stop-loss placement: aggressive and conservative. Both have their advantages and disadvantages, so let's look at how they work.
Aggressive Stop-Loss Placement
With the aggressive approach, you place your stop loss at the low of a bullish breaker block or the high of a bearish breaker block.
The main advantage of this approach is that it gives you a smaller stop loss, allowing you to achieve a higher risk-to-reward ratio. Depending on your entry and target, you could potentially target a 1:3, 1:4, 1:5, or even higher risk-to-reward ratio.
However, the downside is that your stop loss may be more vulnerable to price fluctuations and stop hunts. Since your stop loss is closer to your entry, price has less room to move against you before your trade is stopped out, even if it later continues in your expected direction.
Conservative Stop-Loss Placement
With the conservative approach, you place your stop loss at the swing low in a bullish setup or the swing high in a bearish setup.
The advantage of this method is that it gives the trade more room to breathe and may reduce the chances of being stopped out prematurely by normal price fluctuations.
However, because your stop loss is farther from your entry, you will generally have a larger stop-loss distance and a lower risk-to-reward ratio for the same target.
Which Approach Should You Use?
Both approaches have their advantages and disadvantages. Neither one is the holy grail.
The aggressive approach offers a tighter stop loss and the potential for higher risk-to-reward ratios, while the conservative approach gives price more room to move before your trade is invalidated.
The most important thing is to choose the approach that fits your trading style, test it with historical chart examples, and remain consistent with your choice.
Youtube Video


Read all

Free market insights and exclusive updates, straight to your inbox.
No spam. We hate it as much as you do.
Copyright © 2025 ChartTactix. All rights reserved.
Free market insights and exclusive updates, straight to your inbox.
No spam. We hate it as much as you do.
Copyright © 2025 ChartTactix. All rights reserved.
Copyright © 2025 ChartTactix. All rights reserved.
Market insights and exclusive updates.
No spam. We hate it as much as you do.
Copyright © 2025 ChartTactix. All rights reserved.
Market insights and exclusive updates.
No spam. We hate it as much as you do.